

怎么在Spring的配置文件中对Shiro进行配置
- 网赚资讯
- 1年前
- 5
怎么在Spring的配置文件中对Shiro进行配置 


在这里插入图片描述 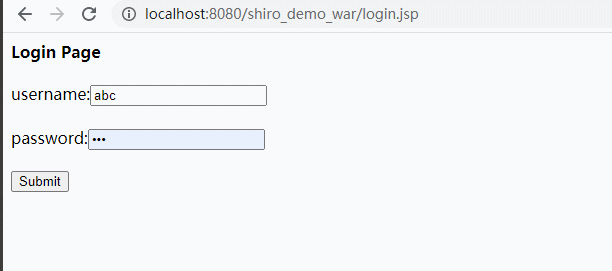
在这里插入图片描述 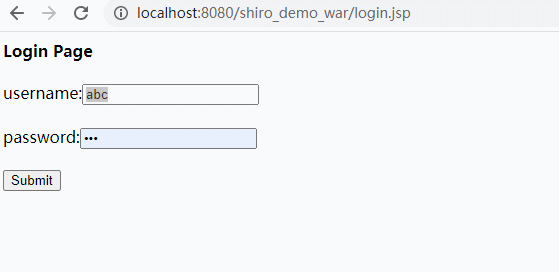
在这里插入图片描述 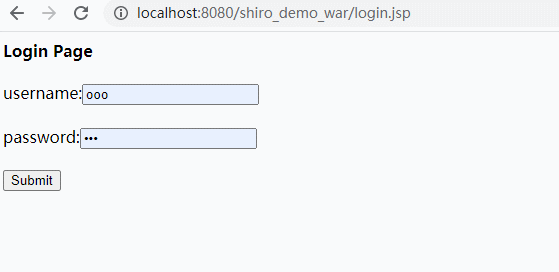
在这里插入图片描述 
在这里插入图片描述 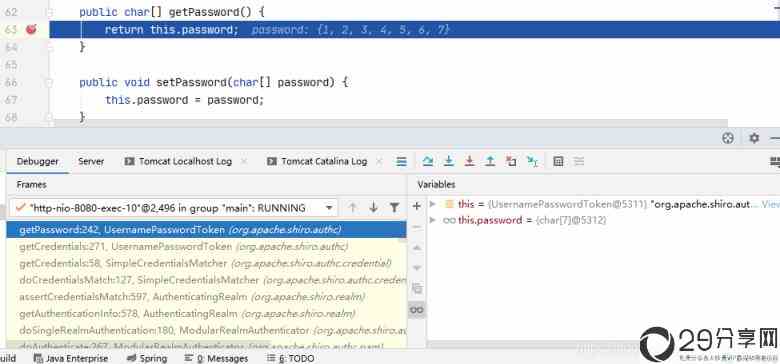
在这里插入图片描述 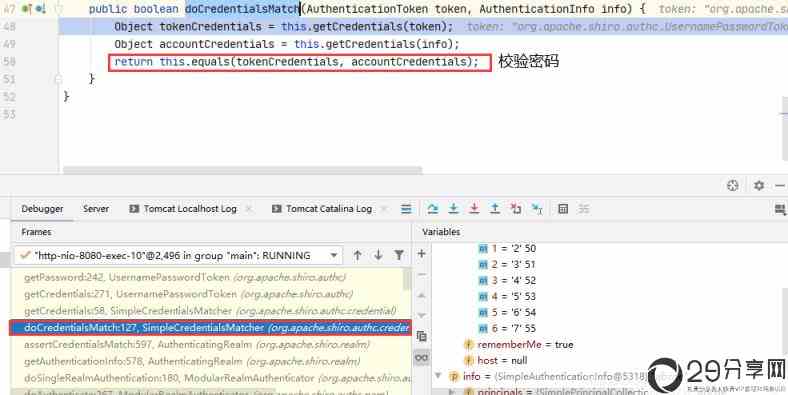
在这里插入图片描述 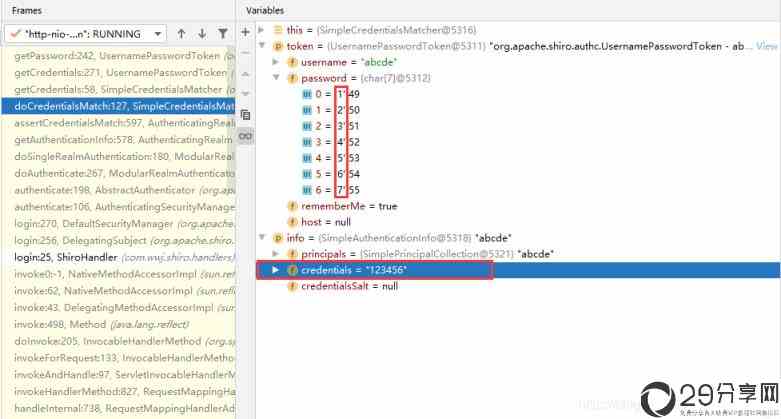
在这里插入图片描述 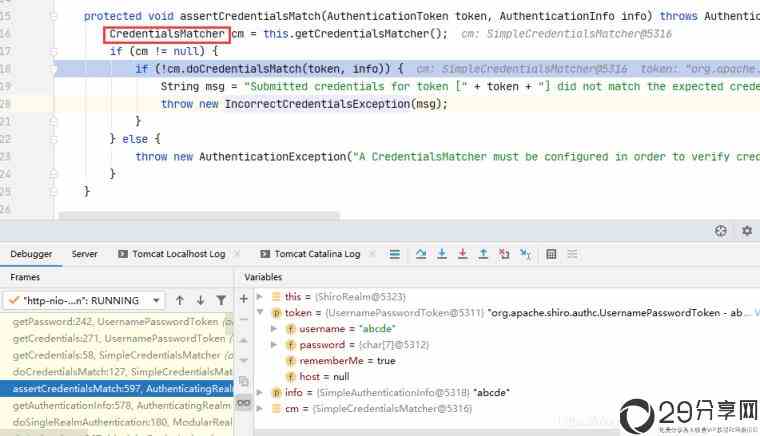
在这里插入图片描述 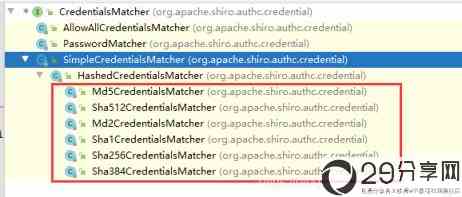
在这里插入图片描述 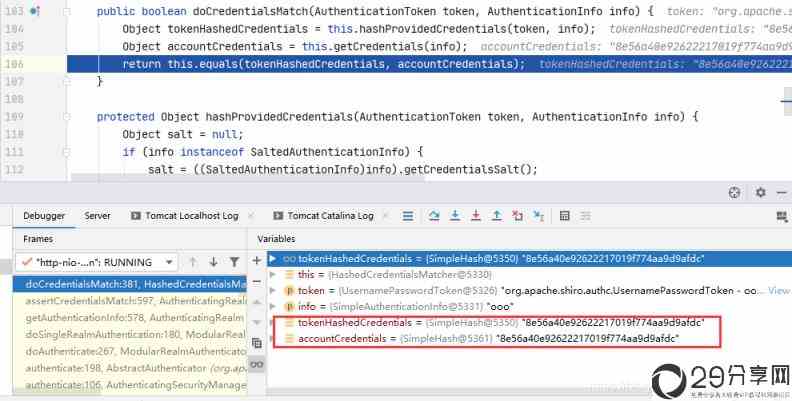
在这里插入图片描述 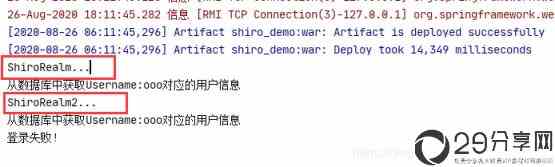
在这里插入图片描述 
在这里插入图片描述 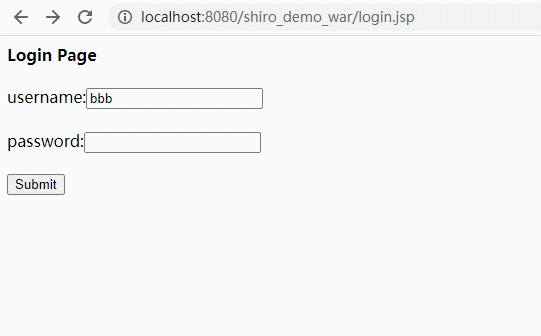
在这里插入图片描述 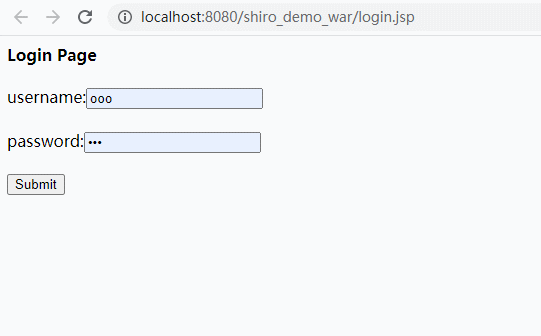
在这里插入图片描述
这篇文章主要讲解了“怎么在Spring的配置文件中对Shiro进行配置”,文中的讲解内容简单清晰,易于学习与理解,下面请大家跟着小编的思路慢慢深入,一起来研究和学习“怎么在Spring的配置文件中对Shiro进行配置”吧!
首先集成Spring、SpringMVC和Shiro
<dependencies><dependency><groupId>org.springframework</groupId><artifactId>spring-context</artifactId><version>4.3.18.RELEASE</version></dependency><dependency><groupId>org.springframework</groupId><artifactId>spring-webmvc</artifactId><version>4.3.18.RELEASE</version></dependency><dependency><groupId>org.apache.shiro</groupId><artifactId>shiro-all</artifactId><version>1.3.2</version></dependency><dependency><groupId>net.sf.ehcache</groupId><artifactId>ehcache-core</artifactId><version>2.6.2</version></dependency></dependencies>
在web.xml文件中配置Shiro的过滤器
1.配置Shiro的shiroFilter.2.DelegatingFilterProxy实际上是Filter的一个代理对象.默认情况下,Spring会到IOC容器中查找和<filter-name>对应的filterbean.也可以通过targetBeanName的初始化参数来配置filterbean的id.--><filter><filter-name>shiroFilter</filter-name><filter-class>org.springframework.web.filter.DelegatingFilterProxy</filter-class><init-param><param-name>targetFilterLifecycle</param-name><param-value>true</param-value></init-param></filter><filter-mapping><filter-name>shiroFilter</filter-name><url-pattern>/*</url-pattern></filter-mapping>
创建Shiro的配置文件(ehcache-shiro.xml)
<ehcacheupdateCheck="false"name="shiroCache"><defaultCachemaxElementsInMemory="10000"eternal="false"timeToIdleSeconds="120"timeToLiveSeconds="120"overflowToDisk="false"diskPersistent="false"diskExpiryThreadIntervalSeconds="120"/></ehcache>
在Spring的配置文件中对Shiro进行配置
<?xmlversion="1.0"encoding="UTF-8"?><beansxmlns="http://www.springframework.org/schema/beans"xmlns:xsi="http://www.w3.org/2001/XMLSchema-instance"xsi:schemaLocation="http://www.springframework.org/schema/beanshttp://www.springframework.org/schema/beans/spring-beans.xsd">1.配置SecurityManager!--><beanid="securityManager"class="org.apache.shiro.web.mgt.DefaultWebSecurityManager"><propertyname="cacheManager"ref="cacheManager"/><propertyname="authenticator"ref="authenticator"/></bean>2.配置CacheManager.2.1需要加入ehcache的jar包及配置文件.--><beanid="cacheManager"class="org.apache.shiro.cache.ehcache.EhCacheManager"><propertyname="cacheManagerConfigFile"value="classpath:ehcache-shiro.xml"/></bean></bean>=========================================================ShiroSpring-specificintegration=========================================================-->Postprocessorthatautomaticallyinvokesinit()anddestroy()methodsforSpring-configuredShiroobjectssoyoudon'thaveto1)specifyaninit-methodanddestroy-methodattributesforeverybeandefinitionand2)evenknowwhichShiroobjectsrequirethesemethodstobecalled.-->4.配置LifecycleBeanPostProcessor.可以自动调用配置在SpringIOC容器中shirobean的生命周期方法.--><beanid="lifecycleBeanPostProcessor"class="org.apache.shiro.spring.LifecycleBeanPostProcessor"/>5.启用IOC容器中使用shiro的注解.但必须在配置了LifecycleBeanPostProcessor之后才可以使用.--><beanclass="org.springframework.aop.framework.autoproxy.DefaultAdvisorAutoProxyCreator"depends-on="lifecycleBeanPostProcessor"/><beanclass="org.apache.shiro.spring.security.interceptor.AuthorizationAttributeSourceAdvisor"><propertyname="securityManager"ref="securityManager"/></bean>6.配置ShiroFilter.6.1id必须和web.xml文件中配置的DelegatingFilterProxy的<filter-name>一致.若不一致,则会抛出:NoSuchBeanDefinitionException.因为Shiro会来IOC容器中查找和<filter-name>名字对应的filterbean.--><beanid="shiroFilter"class="org.apache.shiro.spring.web.ShiroFilterFactoryBean"><propertyname="securityManager"ref="securityManager"/><propertyname="loginUrl"value="/login.jsp"/><propertyname="successUrl"value="/list.jsp"/><propertyname="unauthorizedUrl"value="/unauthorized.jsp"/>配置哪些页面需要受保护.以及访问这些页面需要的权限.1).anon可以被匿名访问2).authc必须认证(即登录)后才可能访问的页面. 3). logout 登出.4).roles角色过滤器--><propertyname="filterChainDefinitions"><value>/login.jsp=anon#everythingelserequiresauthentication:/**=authc</value></property></bean></beans>
配置完成,启动项目即可
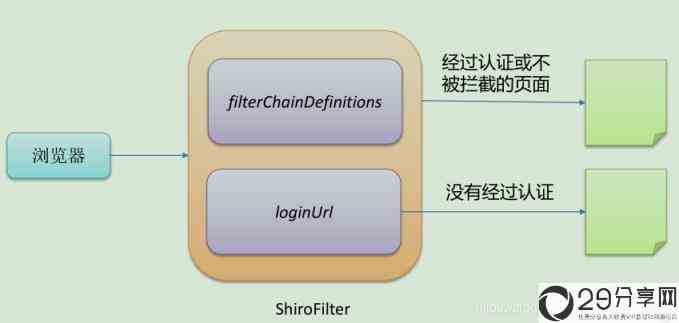
工作流程
Shiro通过在web.xml配置文件中配置的ShiroFilter来拦截所有请求,并通过配置filterChainDefinitions来指定哪些页面受保护以及它们的权限。
URL权限配置
[urls]部分的配置,其格式为:url=拦截器[参数];如果当前请求的url匹配[urls]部分的某个url模式(url模式使用Ant风格匹配),将会执行其配置的拦截器,其中:
anon:该拦截器表示匿名访问,即不需要登录便可访问
authc:该拦截器表示需要身份认证通过后才可以访问
logout:登出
roles:角色过滤器
例:
<propertyname="filterChainDefinitions"><value>/login.jsp=anon#everythingelserequiresauthentication:/**=authc</value></property>
需要注意的是,url权限采取第一次匹配优先的方式,即从头开始使用第一个匹配的url模式对应的拦截器链,如:
/bb/**=filter1
/bb/aa=filter2
/**=filter3
如果请求的url是/bb/aa,因为按照声明顺序进行匹配,那么将使用filter1进行拦截。
Shiro认证流程
获取当前的Subject —— SecurityUtils.getSubject()
校验当前用户是否已经被认证 —— 调用Subject的isAuthenticated()方法
若没有被认证,则把用户名和密码封装为UsernamePasswordToken对象
执行登录 —— 调动Subject的login(UsernamePasswordToken)方法
自定义Realm的方法,从数据库中获取对应的记录,返回给Shiro
自定义类继承org.apache.shiro.realm.AuthenticatingRealm
实现doGetAuthenticationInfo(AuthenticationToken)方法
由Shiro完成对用户名密码的比对
下面具体实现一下,首先创建login.jsp:
<%@pagecontentType="text/html;charset=UTF-8"language="java"%><html><head><title>Title</title></head><body><h5>LoginPage</h5><formaction="shiroLogin"method="post">username:<inputtype="text"name="username"/><br/><br/>password:<inputtype="password"name="password"/><br/><br/><inputtype="submit"value="Submit"/></form></body></html>
然后编写控制器:
packagecom.wwj.shiro.handlers;importorg.apache.shiro.SecurityUtils;importorg.apache.shiro.authc.AuthenticationException;importorg.apache.shiro.authc.UsernamePasswordToken;importorg.apache.shiro.subject.Subject;importorg.springframework.stereotype.Controller;importorg.springframework.web.bind.annotation.RequestMapping;importorg.springframework.web.bind.annotation.RequestParam;@ControllerpublicclassShiroHandler{@RequestMapping("/shiroLogin")publicStringlogin(@RequestParam("username")Stringusername,@RequestParam("password")Stringpassword){//获取当前的SubjectSubjectcurrentUser=SecurityUtils.getSubject();//校验当前用户是否已经被认证if(!currentUser.isAuthenticated()){//把用户名和密码封装为UsernamePasswordToken对象UsernamePasswordTokentoken=newUsernamePasswordToken(username,password);token.setRememberMe(true);try{//执行登录currentUser.login(token);}catch(AuthenticationExceptionae){System.out.println("登录失败"+ae.getMessage());}}return"redirect:/list.jsp";}}
编写自定义的Realm:
packagecom.wwj.shiro.realms;importorg.apache.shiro.authc.*;importorg.apache.shiro.realm.AuthenticatingRealm;publicclassShiroRealmextendsAuthenticatingRealm{/***@paramauthenticationToken该参数实际上是控制器方法中封装用户名和密码后执行login()方法传递进去的参数token*@return*@throwsAuthenticationException*/@OverrideprotectedAuthenticationInfodoGetAuthenticationInfo(AuthenticationTokenauthenticationToken)throwsAuthenticationException{//将参数转回UsernamePasswordTokenUsernamePasswordTokentoken=(UsernamePasswordToken)authenticationToken;//从UsernamePasswordToken中取出用户名Stringusername=token.getUsername();//调用数据库方法,从数据表中查询username对应的记录System.out.println("从数据库中获取Username:"+username+"对应的用户信息");//若用户不存在,则可以抛出异常if("unknow".equals(username)){thrownewUnknownAccountException("用户不存在!");}//根据用户信息的情况,决定是否需要抛出其它异常if("monster".equals(username)){thrownewLockedAccountException("用户被锁定!");}/*根据用户信息的情况,构建AuthenticationInfo对象并返回,通常使用的实现类是SimpleAuthenticationInfo*以下信息是从数据库中获取的:*principal:认证的实体信息,可以是username,也可以是数据表对应的用户实体类对象*credentials:密码*realmName:当前realm对象的name,调用父类的getName()方法即可*/Objectprincipal=username;Objectcredentials="123456";StringrealmName=getName();SimpleAuthenticationInfoinfo=newSimpleAuthenticationInfo(principal,credentials,realmName);returninfo;}}
记得在Spring配置文件中拦截表单请求:
<propertyname="filterChainDefinitions"><value>/login.jsp=anon拦截表单请求-->/shiroLogin=anon登出-->/logout=logout#everythingelserequiresauthentication:/**=authc</value></property>
登录成功后跳转至list.jsp:
<%@pagecontentType="text/html;charset=UTF-8"language="java"%><html><head><title>Title</title></head><body><h5>ListPage</h5><ahref="logout">logout</a></body></html>
这里实现了一个登出请求,是因为Shiro在登录成功后会有缓存,此时无论用户名是否有效,都将成功登录,所以这里进行一个登出操作。
编写完成,最后启动项目即可。
若没有进行登录,将无法访问其它页面,若输入错误的用户名,则无法成功登录,也无法访问其它页面:
若输入正确的用户名和密码,则登录成功,可以访问其它页面:
重新来回顾一下上述的认证流程:
首先在login.jsp页面中有一个表单用于登录,当用户输入用户名和密码点击登录后,请求会被ShiroHandler控制器拦截
在ShiroHandler中校验用户是否已经被认证,若未认证,则将用户名和密码封装成UsernamePasswordToken对象,并执行登录
当执行登录后,UsernamePasswordToken对象会被传入ShiroRealm类的doGetAuthenticationInfo()方法的入参中,在该方法中对数据作进一步的校验
密码校验的过程
在刚才的例子中,我们实现了在用户登录前后对页面权限的控制,事实上,在程序中我们并没有去编写密码比对的代码,而登录逻辑显然对密码进行了校验,可以猜想这一定是Shiro帮助我们完成了密码的校验。
我们在UserNamePasswordToken类中的getPassword()方法中打一个断点:
此时以debug的方式启动项目,在表单中输入用户名和密码,点击登录,程序就可以在该方法处暂停运行:
我们往前找在哪执行了密码校验的逻辑,发现在doCredentialsMatch()方法:
再观察右边的参数:
这不正是我在表单输入的密码和数据表中查询出来的密码吗?由此确认在此处Shiro帮助我们对密码进行了校验。
在往前找找可以发现:
Shiro实际上是用CredentialsMatcher对密码进行校验的,那么为什么要大费周章地来找CredentialsMatcher呢?
CredentialsMatcher是一个接口,我们来看看它的实现类:
那么相信大家已经知道接下来要做什么了,没错,密码的加密,而加密就是通过CredentialsMatcher来完成的。
MD5加密
加密算法其实有很多,这里以md5加密为例。
修改Spring配置文件中对自定义Realm的配置:
<beanid="myRealm"class="com.wwj.shiro.realms.ShiroRealm"><propertyname="credentialsMatcher"><beanclass="org.apache.shiro.authc.credential.HashedCredentialsMatcher"><propertyname="hashAlgorithmName"value="MD5"/>指定加密次数--><propertyname="hashIterations"value="5"/></bean></property></bean>
这里因为Md5CredentialsMatcher类已经过期了,Shiro推荐直接使用HashedCredentialsMatcher。
这样配置以后,从表单中输入的密码就能够自动地进行MD5加密,但是从数据表中获取的密码仍然是明文状态,所以还需要对该密码进行MD5加密:
publicstaticvoidmain(String[]args){StringalgorithmName="MD5";Objectcredentials="123456";Objectsalt=null;inthashIterations=5;Objectresult=newSimpleHash(algorithmName,credentials,salt,hashIterations);System.out.println(result);}
该代码可以参考Shiro底层实现,我们以Shiro同样的方式对其进行MD5加密,两份密码都加密完成了,以debug运行项目,再次找到Shiro校验密码的地方:
我在表单输入的密码是123456,经过校验发现,两份密码的密文是一致的,所以登录成功。
考虑密码重复的情况
刚才对密码进行了加密,进一步解决了密码的安全问题,但又有一个新问题摆在我们面前,倘若有两个用户的密码是一样的,这样即使进行了加密,因为密文是一样的,这样仍然会有安全问题,那么能不能够实现即使密码一样,但生成的密文却可以不一样呢?
当然是可以的,这里需要借助一个credentialsSalt属性(这里我们假设以用户名为标识进行密文的重新加密):
publicstaticvoidmain(String[]args){StringalgorithmName="MD5";Objectcredentials="123456";Objectsalt=ByteSource.Util.bytes("aaa");//Objectsalt=ByteSource.Util.bytes("bbb");inthashIterations=5;Objectresult=newSimpleHash(algorithmName,credentials,salt,hashIterations);System.out.println(result);}
通过该方式,我们生成了两个不一样的密文,即使密码一样:
c8b8a6de6e890dea8001712c9e1494963d12ecfbb349ddbe824730eb5e45deca
既然这里对加密进行了修改,那么在表单密码进行加密的时候我们也要进行修改:
@OverrideprotectedAuthenticationInfodoGetAuthenticationInfo(AuthenticationTokenauthenticationToken)throwsAuthenticationException{//将参数转回UsernamePasswordTokenUsernamePasswordTokentoken=(UsernamePasswordToken)authenticationToken;//从UsernamePasswordToken中取出用户名Stringusername=token.getUsername();//调用数据库方法,从数据表中查询username对应的记录System.out.println("从数据库中获取Username:"+username+"对应的用户信息");//若用户不存在,则可以抛出异常if("unknow".equals(username)){thrownewUnknownAccountException("用户不存在!");}//根据用户信息的情况,决定是否需要抛出其它异常if("monster".equals(username)){thrownewLockedAccountException("用户被锁定!");}/*根据用户信息的情况,构建AuthenticationInfo对象并返回,通常使用的实现类是SimpleAuthenticationInfo*以下信息是从数据库中获取的:*principal:认证的实体信息,可以是username,也可以是数据表对应的用户实体类对象*credentials:密码*realmName:当前realm对象的name,调用父类的getName()方法即可*/Objectprincipal=username;Objectcredentials=null;//对用户名进行判断if("aaa".equals(username)){credentials="c8b8a6de6e890dea8001712c9e149496";}elseif("bbb".equals(username)){credentials="3d12ecfbb349ddbe824730eb5e45deca";}StringrealmName=getName();ByteSourcecredentialsSalt=ByteSource.Util.bytes(username);SimpleAuthenticationInfoinfo=newSimpleAuthenticationInfo(principal,credentials,credentialsSalt,realmName);returninfo;}
这样就轻松解决了密码重复的安全问题了。
多Relam的配置
刚才实现的是单个Relam的情况,下面来看看多个Relam之间的配置。
首先自定义第二个Relam:
packagecom.wwj.shiro.realms;importorg.apache.shiro.authc.*;importorg.apache.shiro.crypto.hash.SimpleHash;importorg.apache.shiro.realm.AuthenticatingRealm;importorg.apache.shiro.util.ByteSource;publicclassShiroRealm2extendsAuthenticatingRealm{@OverrideprotectedAuthenticationInfodoGetAuthenticationInfo(AuthenticationTokenauthenticationToken)throwsAuthenticationException{System.out.println("ShiroRealm2...");UsernamePasswordTokentoken=(UsernamePasswordToken)authenticationToken;Stringusername=token.getUsername();System.out.println("从数据库中获取Username:"+username+"对应的用户信息");if("unknow".equals(username)){thrownewUnknownAccountException("用户不存在!");}if("monster".equals(username)){thrownewLockedAccountException("用户被锁定!");}Objectprincipal=username;Objectcredentials=null;if("aaa".equals(username)){credentials="ba89744a3717743bef169b120c052364621e6135";}elseif("bbb".equals(username)){credentials="29aa55fcb266eac35a6b9c1bd5eb30e41d4bfd8d";}StringrealmName=getName();ByteSourcecredentialsSalt=ByteSource.Util.bytes(username);SimpleAuthenticationInfoinfo=newSimpleAuthenticationInfo(principal,credentials,credentialsSalt,realmName);returninfo;}publicstaticvoidmain(String[]args){StringalgorithmName="SHA1";Objectcredentials="123456";Objectsalt=ByteSource.Util.bytes("bbb");inthashIterations=5;Objectresult=newSimpleHash(algorithmName,credentials,salt,hashIterations);System.out.println(result);}}
这里简单复制了第一个Relam的代码,并将加密方式改为了SHA1。
接下来修改Spring的配置文件:
<?xmlversion="1.0"encoding="UTF-8"?><beansxmlns="http://www.springframework.org/schema/beans"xmlns:xsi="http://www.w3.org/2001/XMLSchema-instance"xsi:schemaLocation="http://www.springframework.org/schema/beanshttp://www.springframework.org/schema/beans/spring-beans.xsd"><beanid="securityManager"class="org.apache.shiro.web.mgt.DefaultWebSecurityManager"><propertyname="cacheManager"ref="cacheManager"/>添加此处配置--><propertyname="authenticator"ref="authenticator"/></bean><beanid="cacheManager"class="org.apache.shiro.cache.ehcache.EhCacheManager"><propertyname="cacheManagerConfigFile"value="classpath:ehcache-shiro.xml"/></bean>添加此处配置--><beanid="authenticator"class="org.apache.shiro.authc.pam.ModularRealmAuthenticator"><propertyname="realms"><list><refbean="myRealm"/><refbean="myRealm2"/></list></property></bean><beanid="myRealm"class="com.wwj.shiro.realms.ShiroRealm"><propertyname="credentialsMatcher"><beanclass="org.apache.shiro.authc.credential.HashedCredentialsMatcher"><propertyname="hashAlgorithmName"value="MD5"/><propertyname="hashIterations"value="5"/></bean></property></bean>添加此处配置--><beanid="myRealm2"class="com.wwj.shiro.realms.ShiroRealm2"><propertyname="credentialsMatcher"><beanclass="org.apache.shiro.authc.credential.HashedCredentialsMatcher"><propertyname="hashAlgorithmName"value="SHA1"/><propertyname="hashIterations"value="5"/></bean></property></bean><beanid="lifecycleBeanPostProcessor"class="org.apache.shiro.spring.LifecycleBeanPostProcessor"/><beanclass="org.springframework.aop.framework.autoproxy.DefaultAdvisorAutoProxyCreator"depends-on="lifecycleBeanPostProcessor"/><beanclass="org.apache.shiro.spring.security.interceptor.AuthorizationAttributeSourceAdvisor"><propertyname="securityManager"ref="securityManager"/></bean><beanid="shiroFilter"class="org.apache.shiro.spring.web.ShiroFilterFactoryBean"><propertyname="securityManager"ref="securityManager"/><propertyname="loginUrl"value="/login.jsp"/><propertyname="successUrl"value="/list.jsp"/><propertyname="unauthorizedUrl"value="/unauthorized.jsp"/><propertyname="filterChainDefinitions"><value>/login.jsp=anon/shiroLogin=anon/logout=logout#everythingelserequiresauthentication:/**=authc</value></property></bean></beans>
注释的地方就是需要修改的地方。
此时我们启动项目进行登录,查看控制台信息:
可以看到两个Relam都被调用了。
认证策略
既然有多个Relam,那么就一定会有认证策略的区别,比如多个Relam中是一个认证成功即为成功还是要所有Relam都认证成功才算成功,Shiro对此提供了三种策略:
FirstSuccessfulStrategy:只要有一个Relam认证成功即可,只返回第一个Relam身份认证成功的认证信息,其它的忽略
AtLeastOneSuccessfulStrategy:只要有一个Relam认证成功即可,和FirstSuccessfulStrategy不同,它将返回所有Relam身份认证成功的认证信息
AllSuccessfulStrategy:所有Relam认证成功才算成功,且返回所有Relam身份认证成功的认证信息
默认使用的策略是AtLeastOneSuccessfulStrategy,具体可以通过查看源码来体会。
若要修改默认的认证策略,可以修改Spring的配置文件:
授权<beanid="authenticator"class="org.apache.shiro.authc.pam.ModularRealmAuthenticator"><propertyname="realms"><list><refbean="myRealm"/><refbean="myRealm2"/></list></property>修改认证策略--><propertyname="authenticationStrategy"><beanclass="org.apache.shiro.authc.pam.AllSuccessfulStrategy"/></property></bean>
授权也叫访问控制,即在应用中控制谁访问哪些资源,在授权中需要了解以下几个关键对象:
主体:访问应用的用户
资源:在应用中用户可以访问的url
权限:安全策略中的原子授权单位
角色:权限的集合
下面实现一个案例来感受一下授权的作用,新建aaa.jsp和bbb.jsp文件,并修改list.jsp:
<%@pagecontentType="text/html;charset=UTF-8"language="java"%><html><head><title>Title</title></head><body><h5>ListPage</h5><ahref="aaa.jsp">aaaPage</a><br/><br/><ahref="bbb.jsp">bbbPage</a><br/><br/><ahref="logout">logout</a></body></html>
现在的情况是登录成功之后就能够访问aaa和bbb页面了:
但是我想实现这样一个效果,只有具备当前用户的权限才能够访问到指定页面,比如我以aaa用户的身份登录,那么我将只能访问aaa.jsp而无法访问bbb.jsp;同样地,若以bbb用户的身份登录,则只能访问bbb.jsp而无法访问aaa.jsp,该如何实现呢?
实现其实非常简单,修改Sping的配置文件:
<propertyname="filterChainDefinitions"><value>/login.jsp=anon/shiroLogin=anon/logout=logout添加角色过滤器-->/aaa.jsp=roles[aaa]/bbb.jsp=roles[bbb]#everythingelserequiresauthentication:/**=authc</value></property>
启动项目看看效果:
这里有一个坑,就是在编写授权之前,你需要将Relam的引用放到securityManager中:
<beanid="securityManager"class="org.apache.shiro.web.mgt.DefaultWebSecurityManager"><propertyname="cacheManager"ref="cacheManager"/><propertyname="authenticator"ref="authenticator"/><propertyname="realms"><list><refbean="myRealm"/><refbean="myRealm2"/></list></property></bean>
否则程序将无法正常运行。
现在虽然把权限加上了,但无论你是aaa用户还是bbb用户,你都无法访问到页面了,Shiro都自动跳转到了无权限页面,我们还需要做一些操作,对ShiroRelam类进行修改:
packagecom.wwj.shiro.realms;importorg.apache.shiro.authc.*;importorg.apache.shiro.authz.AuthorizationInfo;importorg.apache.shiro.authz.SimpleAuthorizationInfo;importorg.apache.shiro.crypto.hash.SimpleHash;importorg.apache.shiro.realm.AuthorizingRealm;importorg.apache.shiro.subject.PrincipalCollection;importorg.apache.shiro.util.ByteSource;importjava.util.HashSet;importjava.util.Set;publicclassShiroRealmextendsAuthorizingRealm{@OverrideprotectedAuthenticationInfodoGetAuthenticationInfo(AuthenticationTokenauthenticationToken)throwsAuthenticationException{UsernamePasswordTokentoken=(UsernamePasswordToken)authenticationToken;Stringusername=token.getUsername();System.out.println("从数据库中获取Username:"+username+"对应的用户信息");if("unknow".equals(username)){thrownewUnknownAccountException("用户不存在!");}if("monster".equals(username)){thrownewLockedAccountException("用户被锁定!");}Objectprincipal=username;Objectcredentials=null;if("aaa".equals(username)){credentials="c8b8a6de6e890dea8001712c9e149496";}elseif("bbb".equals(username)){credentials="3d12ecfbb349ddbe824730eb5e45deca";}StringrealmName=getName();ByteSourcecredentialsSalt=ByteSource.Util.bytes(username);SimpleAuthenticationInfoinfo=newSimpleAuthenticationInfo(principal,credentials,credentialsSalt,realmName);returninfo;}/***授权时会被Shiro回调的方法*@paramprincipalCollection*@return*/@OverrideprotectedAuthorizationInfodoGetAuthorizationInfo(PrincipalCollectionprincipalCollection){//获取登录用户的信息Objectprincipal=principalCollection.getPrimaryPrincipal();//获取当前用户的角色Set<String>roles=newHashSet<>();roles.add("aaa");if("bbb".equals(principal)){roles.add("bbb");}//创建SimpleAuthorizationInfo,并设置其roles属性SimpleAuthorizationInfoinfo=newSimpleAuthorizationInfo(roles);returninfo;}}
首先将继承的类做了修改,改为继承AuthorizingRealm类,可以通过实现该类的doGetAuthenticationInfo()方法完成认证,通过doGetAuthorizationInfo()方法完成授权,所以源代码不用动,直接添加下面的doGetAuthorizationInfo()方法即可,看运行效果:
可以看到aaa用户只能访问到aaa.jsp而无法访问bbb.jsp,但是bbb用户却能够访问到两个页面,如果你仔细观察刚才添加的方法你就能够明白为什么。
@OverrideprotectedAuthorizationInfodoGetAuthorizationInfo(PrincipalCollectionprincipalCollection){//获取登录用户的信息Objectprincipal=principalCollection.getPrimaryPrincipal();//获取当前用户的角色Set<String>roles=newHashSet<>();roles.add("aaa");if("bbb".equals(principal)){roles.add("bbb");}//创建SimpleAuthorizationInfo,并设置其roles属性SimpleAuthorizationInfoinfo=newSimpleAuthorizationInfo(roles);returninfo;}
因为不管是什么用户登录,我都将aaa用户添加到了roles中,所以bbb用户是具有aaa用户权限的,权限完全是由你自己控制的,想怎么控制你就怎么写。
注解实现授权
先来看看关于授权的几个注解:
@RequiresAuthentication:表示当前Subject已经通过login进行了身份验证;即 Subject. isAuthenticated()返回 true
@RequiresUser:表示当前 Subject 已经身份验证或者通过记住我登录的
@RequiresGuest:表示当前Subject没有身份验证或通过记住我登录过,即是游客身份。
@RequiresRoles(value={“aaa”, “bbb”}, logical=Logical.AND):表示当前 Subject 需要角色aaa和bbb
@RequiresPermissions (value={“user:a”, “user:b”},logical= Logical.OR):表示当前 Subject 需要权限user:a 或user:b
把Spring配置文件中的角色过滤器删掉,然后定义一个Service:
packagecom.wwj.shiro.service;importorg.apache.shiro.authz.annotation.RequiresRoles;importorg.springframework.stereotype.Service;@ServicepublicclassShiroService{@RequiresRoles({"aaa"})publicvoidtest(){System.out.println("test...");}}
在test()方法上添加注解@RequiresRoles({"aaa"}),意思是该方法只有aaa用户才能访问,接下来在ShiroHandler中添加一个方法:
@AutowiredprivateShiroServiceshiroService;@RequestMapping("/testAnnotation")publicStringtestAnnotation(){shiroService.test();return"redirect:/list.jsp";}
此时当你访问testAnnotation请求时,只有aaa用户能够成功访问,bbb用户就会抛出异常。
uiresRoles(value={“aaa”, “bbb”}, logical=Logical.AND):表示当前 Subject 需要角色aaa和bbb
@RequiresPermissions (value={“user:a”, “user:b”},logical= Logical.OR):表示当前 Subject 需要权限user:a 或user:b
把Spring配置文件中的角色过滤器删掉,然后定义一个Service:
packagecom.wwj.shiro.service;importorg.apache.shiro.authz.annotation.RequiresRoles;importorg.springframework.stereotype.Service;@ServicepublicclassShiroService{@RequiresRoles({"aaa"})publicvoidtest(){System.out.println("test...");}}
在test()方法上添加注解@RequiresRoles({"aaa"}),意思是该方法只有aaa用户才能访问,接下来在ShiroHandler中添加一个方法:
@AutowiredprivateShiroServiceshiroService;@RequestMapping("/testAnnotation")publicStringtestAnnotation(){shiroService.test();return"redirect:/list.jsp";}
此时当你访问testAnnotation请求时,只有aaa用户能够成功访问,bbb用户就会抛出异常。
感谢各位的阅读,以上就是“怎么在Spring的配置文件中对Shiro进行配置”的内容了,经过本文的学习后,相信大家对怎么在Spring的配置文件中对Shiro进行配置这一问题有了更深刻的体会,具体使用情况还需要大家实践验证。这里是29分享网,小编将为大家推送更多相关知识点的文章,欢迎关注!
有话要说...